Pages

Tuesday, March 31, 2015

Teal Eyeliner Tutorial

Hiii :)
Today I'm going to tell you how to get my new favorite look.. using teal liquid eyeliner! I think you'll be surprised how easy it is. It took some practice for me to get the liner just right, but I love it! I have worn this look a few times since I got the liner :)) So, I'll give you two ways to wear this liner, but there are obviously so many ways. 
First look is using the new Makeup Geek eyeshadow in Poppy!
  • Apply Makeup Geek's Peach Smoothie & Créme Brulee in the crease with a big fluffy brush  (like the Sigma E40) and blend, blend, blend.
  • Apply Makeup Geek's Cocoa Bear in the crease, focusing on the outer corner. 
  • Then apply Makeup Geek's Poppy eyeshadow all over the crease area. You can do this as dark or as light as you want :) This color can really pop if you want it to! 
  •  Apply Makeup Geek's Bling to the center of the lid, the brow bone, and the inner corner of the eye to highlight those areas. 
  • Now blend everything in the crease together using Anastasia Beverly Hill's Fresh Peach eyeshadow with a big fluffy brush! 
  • I applied all these colors I just used to the lower lash line. I really emphasized Poppy and Fresh Peach (I used the Sigma E30 to apply). 
  • Apply black winged liner (I used Maybelline gel liner in Blackest Black), I used the Sigma E65.
  • I applied Jordana's 12 Hour Made to Last Eyeshadow Pencil in the color Continuous Almond to the waterline in order to make my eyes look wider.
  • Now for the star of the show.. Apply NYX Cosmetics Glam Liner Aqua Luxe liner in Lagoon just above the black liner. If you mess up your liner or can't get the wing sharp enough, correct your mistake with a small flat brush and some concealer. 
So this is the finished look (Lashes are Velour Lashes Girl You CRAAZY!)!!
 I used Gerard Cosmetics lipstick in Buttercup and Kimchi Doll on the lips with Jordana lipliner in Tawny. Another lip option is OCC Lip Tar in Pleasure Model over top of Kimchi Doll. I actually don't like how my lips look in this picture at all, Kimchi Doll alone would have looked better!
Now here's another option for this liner that I've worn :) This one is a bit more neutral.
I'm wearing Gerard Cosmetics lipstick in Buttercup. Lashes are Velour Lashes Whispie Sweet Nothings.
  • Apply Makeup Geek's Peach Smoothie & Créme Brulee in the crease & blend, blend, blend. 
  • Apply Makeup Geek's Cocoa Bear to the crease, again focusing on the inner corner.
  • Apply a tiny bit of Anastasia Beverly Hill's Chocolate, or just a dark brown color, to the outer corner (this color is PIG-MEN-TED) and blend away. 
  • Apply Makeup Geek's Afterglow pigment to the center of the lid!
  • Apply Makeup Geek's Bling brow bone, and inner corner of the eye to highlight. 
  • Now apply all those colors to the lower lash line, I concentrated Chocolate to the outer corner and tried to keep it as close to the lash line as possible using the e.l.f. Essential Smudge Brush
  • Apply Jordana's 12 Hour Made to Last Eyeshadow Pencil in the color Continuous Almond to the waterline.
  • Apply a black, winged liner (like the Maybelline gel liner in Blackest Black).
  • Now apply the beautiful NYX Cosmetics Glam Liner Aqua Luxe liner in Lagoon :)) 
I just love this liner :) 
Thank you so, so much for reading my blog! I hope you liked it! Be sure to follow Pretty and Put Together on Instagram, Twitter, Pinterest, and like on Facebook to stay updated on the latest posts & other fun stuff! 
https://instagram.com/chelseeparker77/

Wednesday, March 25, 2015

OOTD Spring Break Shopping

Hi guys :)
I want to start off by saying thank you all so much for your support of my little blog. It means a lot! 

So, I started off my Spring Break with the family in Salt Lake City. We went shopping in Lehi and Salt Lake City, and then went to the Hogle Zoo. I put together this outfit for one of our shopping days! 
I made a list of the things I wanted to shop for most, and this black hat was one of them!! I do plan on adding some sort of lace or leather

This picture was taken at the Outlets at Traverse Mountain, definitely check it out! I love this outlet mall. If you are in Lehi, Utah and decide to stop here, go to the Bona Vita Italian Bistro. I had some of the best alfredo I've ever had in my life.. not kidding! 
SHOES: Target
JEANS: Bohme Boutique- Flying Monkey 
TANK: Nordstrom Rack- Project Social T
CARDIGAN: Nordstrom Rack- 14th & Union
BRACELETS: Buckle 
HAT: H&M- Divided
PURSE: Dillard's- Antonio Melani 
SUNGLASSES: Dillard's, Polaroid 
Thanks for stopping by to read this little blog post :) Happy Spring & have a good week!!
Be sure to follow Pretty & Put Together on social media for the latest posts on Instagram, Twitter, Pinterest, and like on Facebook!
https://instagram.com/chelseeparker77

Tuesday, March 17, 2015

Hair Care

Happy St. Patrick's Day!

About five years ago I cut my hair off to my jawline (you have to try it once..), immediately I wanted it back. I get asked all the time if I wear extensions & how I got my hair to grow back so fast, but honestly it's taken this long! I get my hair trimmed every 6-8 weeks :) I used to ask for a "germ-sized trim" when I was still trying to grow it out haha!!
Not only has it taken years, but I've done some damage along the way. I've tried to lighten my hair multiple times & damaged it, which probably slowed growth. But here are some things I think have helped my hair grow and stay healthy recently:
First, Brazillian Blowout! I have only had two in my life so far. The first one I got a few years ago, & I just got one again last month. I would highly recommend getting one! For me, they help to straighten my curls a bit, make my hair shiny, soft, healthy, protected, & lock in color. The biggest thing I noticed it that my hair isn't frizzy! 
I got my last Brazilian Blowout at Jagged Edge Salon. The whole process took about two hours (on my ridiculous amount of hair). 
My sister gets her Brazilian Blowouts from Maleri Miller Parker & both do a great job, we had the same results :) 
My hair is so much easier to do now, & when I straighten it the style lasts longer. If you're trying to grow out your hair or repair some damage I would suggest finding a salon near you that does Brazilian Blowouts. They last up to 12 weeks. The picture above was taken right after getting a blowout.
Shampoo & Conditioner:
Because my hair is so long, it gets dry pretty easy at the ends. I only wash my hair twice a week, sometimes three if it gets oily. 
I change shampoo & conditioner all the time, but since my hair has been red I started using Bain de Terre Color-Protecting shampoo & conditioner.
I also use Joico Color Infuse Red products to keep my red color vibrant between appointments. I use the color infuse once a week (*The color of my hair is Joico 5XR).
Since my Baine de Terre products are almost gone I purchased the Redken Color Extend Magnetics shampoo and conditioner at Ulta, I'll let you know if I like it!
Deep Conditioning: 
I've used Coconut Oil for a long time now on my hair. I just melt it in the sink and apply to dry hair. If you can apply heat or leave it over night that's the best. Remember to look for unrefined, organic coconut oil.
I realize that drugstore products are not the best for your hair, but I actually really like the Garnier Fructis Damage Eraser Strength Reconstructing Butter with phyto-keratin complex. 
I just recently bought the Not Your Mother's Intensive Hair Unit Renewal Treatment and I really like it! Plus it smells good. It has carrot root extract to help repair damaged hair. 
I alternate using one of these once a week. 
Smooth & Shine:
In the past I've used the Brazilian Blowout product until I ran out. I've been using the Rusk Shine Enhancing Lusterizer for a while now. It helps with shine, strengthening with proteins, and protective UVB inhibitors. 
I have recently been using Not Your Mother's Smooth Moves Frizz Control Hair Cream (Ulta in-stores). This helps to de-frizz, straighten, and shine hair. I put these on towel-dried hair. 
Oils & Protectant: 
OGX Coconut Milk Anti-Breakage Serum is awesome! It smells so good too. I use this every single day on the ends of my hair to smooth. This helps repair, resurface, and mend split ends with coconut oil and silk proteins. 
Moroccon Oil Treatment is more expensive, so I use this just a few times a week, and always after I wash my hair. This also helps restore hair, smooth, and shine.
To protect my hair from heat I use Kevin Murphy Damage Manager. This protects hair up to 428 degrees Fahrenheit.
Red Hair Maintenance: 
Besides the Joico Color Infuse products, I have been desperate for a root cover recently. I found this Beyond the Zone Colour Mousse in racy red at Sally's Beauty Supply and it seems to work pretty good, but it did not last 2-3 shampoos on my hair. I applied to dry roots, brushed it in, then blow-dried to seal the color in.
Dry Shampoo: 
Because I only wash my hair two times a week, sometimes the roots can get oily while the ends are dry. Rather than having to wash my hair and go through that whole process I use a dry shampoo. There are tons of great dry shampoos out there, and I really like this one by Tresemmé and the Not Your Mother's brand.
Vitamins:
I know this seems random, but what you put in your body has an effect on your hair. Of course you should eat healthy, but I also recommend vitamins. I take like, 50 vitamins every day haha (exaggeration, slightly)! Of the ones I take I think these have an effect on my hair. 
Melaleuca Vitality Multivitamin and Mineral for women. I noticed this has Biotin in it, which can help with brittle nails and hair growth. I take this every day. 
Cod Liver Oil has Vitamin A which can help with new cell growth and health especially for the eyes and skin. But there are many other benefits to this vitamin, read here. It really doesn't say anything about hair, but I have been taking this for about a year now, so maybe it has played a role in the health of my hair. 
Omega-3 Krill Oil has many amazing benefits as well, especially for heart health. I'm also not sure this played a direct role in my hair health, but it's worth a try :) 
Keratin: 
Lastly, I want to mention something I think had a huge effect on my hair. I don't currently have this product because too much keratin can actually damage your hair (said the lady at Ulta). But this is the It's a 10 Miracle Leave-In Plus Keratin!! When I tried to lighten my hair last summer, I had just got my hair to the length I wanted it to be and then lost about two/three inches to damage from the highlights. This seriously was a miracle on my hair, well this & dying it darker. I went through two bottles of this ;) Highly recommend!
Thank you so much for reading!! I hope you enjoyed and maybe learned something! I'm definitely not a hair expert, but I've pretty much had long, curly, thick hair my whole life! It's a love/hate relationship.. :) Follow Pretty & Put Together on Instagram, Twitter, Pinterest, and like us on Facebook to stay updated on the latest posts! 
https://instagram.com/chelseeparker77


Wednesday, March 11, 2015

Duochrome Purple/Pink Makeup Look

Hello :)
I wore this look on Valentine's Day this year, I loved it so much I thought I'd share! So, if you want to see how I got this look keep reading! 
Eyes: 
First I apply MAC Pro Longwear Concealer in NW20 to prime the eyes. 
As a transition shade in the crease I applied Peach Smoothie by Makeup Geek with a Sigma E40 blending brush. 
Again in the crease I apply Birkin & Dusty Rose from Anastasia Beverly Hills using the E40, focusing the color on the outer corner and blending in. For this look you don't want any harsh lines so blend away!! 
Now take Iridescent Purple (purple with blue iridescence) by Anastasia Beverly Hills and apply it on the outer corner of the lid area using any flat eyeshadow brush. I also layered with Opaline to darken the purple a bit.
On the center of the lid to the inner corner comes my favorite color in this look.. ELECTRO by Anastasia Beverly Hills!! This shadow is amazing! It's a duochrome bright purple with blue iridescence color so it reflects the different colors in different lighting. If you apply this with MAC Fix+ or eye drops the color will become even more intense.
(Indoor lighting, you can see how they reflect different colors)
On the lower lash line use the same ombré effect from Opaline, Iridescent Purple, to Electro into the inner corner. 
To highlight the brow bone and inner corner of the eye I used Bling from Makeup Geek.  


To see the Anastasia Beverly Hills shadows swatches click here

Lashes: 
These lashes are Velour Lashes "Loose Ends" lashes (look up coupon codes!)
Liner: 
Maybelline gel liner in "Blackest Black" on top.
Nyx Cosmetics retractable eye pencil in "Purple" in the waterline.
Brows: 
Anastasia Beverly Hills Dipbrow in "Dark Brown." 
Face: 
Revlon ColorStay 24 hours liquid foundation for normal/dry skin in "Nude" & Revlon ColorStay powder in "Fair." Anastasia Beverly Hills "Banana" powder under the eyes.
Contour: 
Nose contour is Anastasia Beverly Hills Fawn. Cheeks & forehead are Fawn & Java
Blush: 
Makeup Geek "Head Over Heels" and MAC "Margin." 
Highlighter: 
Hourglass Ambient Lighting Powder in "Luminous Light 
on the cheekbones, bridge of the nose, and cupid's bow.
Lips: 
Gerard Cosmetics "Buttercup" lipstick and "Butter Cream" lighted lip gloss (look up coupon codes! I've never paid full price for these!!).
Setting Spray: 
I used Urban Decay "De-Slick" makeup setting spray to set everything since I have oily skin :) 
This stuff is the best!  
Jewelry: 
Earrings are from a Premier Designs jewelry party. 

Thanks for reading! Also, I had someone ask me what my hair color is, and it's Joico 5XR :) 
Be sure to follow Pretty and Put Together on Instagram, Twitter, Pinterest, and like us on Facebook! New blog post every week! xo
https://instagram.com/chelseeparker77


Tuesday, March 3, 2015

The BeautyBlender: Review & Info

Haay!
This week is all about the beautyblender
I've been using this now for over three weeks to see how I liked it and... I LOVE it! I was one of the doubters at first because of the price ($19.95), the fact that it is a sponge, and that you use it damp. That just didn't make sense to me. Give it a chance.. It won't fail you. 
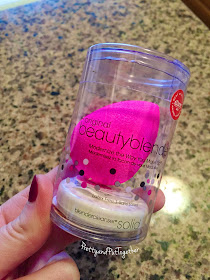
I got my beautyblender sponge and solid cleanser from Nordstrom (the particular set isn't available right now). There are a few types of beauty blenders and combinations of blenders and cleansers. This pink one is the original, they now have a pure sponge, pro sponge, and micro mini sponges.

When you get the beauty blender you might be shocked (like I was) about how teeny tiny it is. What is so crazy about it is that as soon as you wet the sponge it gets about twice as big! So you want to put the sponge under water and squeeze until it stops growing. Squeeze out excess liquid with a towel.
One thing to be aware of... This sponge should be used wet!!! 
You can see in this picture how much bigger it gets after wetting it, compare it to the package! It doesn't even fit into the container when it's wet. Set it on top of the container to air dry, and it will eventually fall back into the container once it shrinks :)
How I use it: I have dipped the sponge into my makeup before and I have also just used it to blend out my makeup. I personally use the sponge mostly for concealer (eyes, under eyes, forehead, bridge of the nose, chin). I put the concealer on with my fingers and then blend it out with the wet beauty blender. Seriously... FLAWLESS application with this.
My sister uses it for foundation and concealer and loves it for that, and I know other people use it for liquid contour and it works great! It really leaves an amazing airbrush finish. You want to "bounce" it onto your skin.
As far as the solid beautyblender cleanser goes, I actually really like it. I found that it can take a while to clean the sponge (or maybe mine was just super dirty..) so I combined this cleanser with a makeup remover.
You'll notice that when you wash it some pink color will come out.. Don't worry your beauty blender is not full of chemicals used to color it and it won't completely wash out. The beautyblender is latex free, recyclable, and non-allergenic. I really like the smell of it too when it comes brand new :)
I truly love this little guy :) He's changed the way I apply my makeup.. And they just released a cute little travel case that I have to have! *The ONE negative thing about this is that they recommend replacing this every three months. I probably won't but we will see how clean I can keep it before it starts to affect my skin!
If you think that the other knock-off sponges will do the same things that the beautyblender does you're wrong! I understand that some of the other sponges out there are less than half the price, but they are going to soak up more product and not apply as well. I would say go ahead and splurge on the original beautyblender.
https://instagram.com/chelseeparker77I hope you enjoyed this post & learned something new! Follow Pretty and Put Together on Instagram, Twitter, Pinterest, and like us on Facebook! xoxo