Tuesday, April 28, 2015

Makeup Geek NEW Foiled Eyeshadows!

Happy Tuesday!

I literally ran outside to get my package today because.. it was some of the new Makeup Geek Cosmetics foiled eyeshadows I ordered (along with one regular eyeshadow in there)! They came so much faster than I expected with my pre-order! Yay!! I can't wait to create some looks with these for you guys! I already own many of the other foiled eyeshadows that were released in 2014 and I love them so much. 
This blog post will be a review & swatches! Let me know which shadows you want to see me use in a look ;) 
The foiled eyeshadows come in this chic rose gold packaging, and the regular shadows come in the white packaging. They arrived in perfect condition and within less than a week from the day I ordered. They were actually shipped on the day I ordered them!
Foiled shadows are $9.99
Regular shadows are $5.99
The reason they are called foiled eyeshadows is because they actually look like a foiled shine on the eye, without having to add any liquid to them. They are packed with pigment! The formula is very soft and smooth (like most MUG eyeshadows, because they're the best). You can apply them with a brush or just your finger. 
Let's start with Whimsical. This is a "light silvery pink with a foiled finish." This could also double as a highlight because it's such a soft frosted color! Beautiful.
This is Starry Eyed. "Light champagne beige with slight pink undertones and a foiled finish." This reminds me of a lighter version of the color Grand Stand.
This is High Wire! "Medium silver with subtle blue undertones." This color would look amazing on the lid whether you're doing a dramatic look or take it down to a day-to-day look.
This is Day Dreamer. I HAD to have this one. "Light lilac purple with cool undertones and a foiled finish." I loooove my purples.
This is Fantasy.. and doesn't it look like one. "Mint green with a foiled finish."
Meet Pegasus.. Oh my gosh I love this color. Aqua is my FAVORITE right now!! This one probably stood out to me the most out of the new collection :) "Light, bright aqua with a foiled finish." Yaaaaas!
And this random guy.. He's been on my wish list forever so I decided to get him :) This is Shark Bait (ooh-ah-ah). "Blue based green with a matte finish." This one is obviously not a foiled eyeshadow, but isn't is pretty?!
Now for the SWATCHES..
These pictures were taken in natural lighting. You can see how shiny and foiled-looking they are. Gorg.
These pictures were taken with the flash on. WOW right?!
Thanks for stopping by!! I hope this was helpful or you learned something today :)
Be sure to follow Pretty and Put Together on Instagram, Twitter, Pinterest, and like on Facebook to stay updated! To follow my personal page click on my name below!

Tuesday, April 21, 2015

Current Nighttime Skin Care Routine

This week I am talking about my nighttime skincare routine. I got a request for this so here you go! 
I just want to mention that I do not have perfect skin at all, I still get hormonal breakouts and sometimes dry patches. I used to have terrible skin and acne, so right now my skin is the best it's been since high school! I'm very happy with it right now! 
I have combination skin, my T-zone is very oily while other parts of my face can be dry. 
 So here's everything I use at night before I go to bed. This is my everyday nighttime skincare routine. Sometimes I'll change it up a little by using a mask, acne cream, or scar gel. But what you see here are my go-to products!!
This is Neutrogena oil-free eye makeup remover. It does an awesome job at removing waterproof mascara! I've been using this for years. I will say the knock off brand you can sometimes find at Walgreens works just as well. $7.99
First I remove my eye makeup. If I have false lashes on I will dip a q-tip into this makeup remover and rub onto the lash band until it loosens. Then I apply this makeup remover to a cotton pad and remove the remaining eye makeup.
These is the equate Original Clean Wet Cleansing Towlettes (with Vitamin E). These are very inexpensive and you get 60 wipes in each pack, and they come in sets of two packs. $5.97
After removing my eye makeup, I wet my whole face and use a towelette to remove most face makeup. These particular wipes aren't as wet as some other brands I've used, but with these you get the most bang for your buck.
This is the Farmhouse Fresh One Fine Day Shea Sugar Flawless Face Polish. This stuff is awesome and I really want to try more products from this brand! $25
I splash my face with warm water and then scrub my face with this product (make sure you have clean hands!). It smells really great! This product is for all skin types.
I use Dickinson's Original Witch Hazel pore perfecting toner to really get into those pores. This is 100% natural. You get 16 fl oz for so cheap! $4.47
Some negative things about this are that it doesn't smell good, and the bottle leaks when you travel with it. Other than that it's amazing!
To moisturize my skin I use Yes to Cucumbers soothing daily calming moisturizer (hypoallergenic, paraben-free, and 98% natural). $14.99
This moisturizer is a little more expensive but I only use just a tiny bit and it works great on my skin. I have some redness to my face so I love using anything with cucumber to sooth that redness.
To sooth my puffy dark eyes I use Yes to Cucumbers soothing eye gel (dermatologist tested, 99% natural product). $14.99
This is also kind of expensive but I just use a tiny bit every night. This bottle will last me for months.
Because I have some dark spots and scarring from acne I use Bio-Oil (PurCellin Oil). This is also good for stretch marks, uneven skin tone, aging skin, and dehydrated skin. $9.99 
This bottle is 2 oz, but also comes in larger sizes. I've had this bottle for quite a while because I only use a small amount on my face every night. I honestly think using this has significantly improved my acne scarring and actually helped with my oily skin. 
Even people with oily skin should use a skin oil. If you try to dry out your oily skin, your skin will only produce more oil to compensate. Read about using oil here.
To care for my chapped lips I use a lip scrub. This is the Santa's lip scrub from LUSH Cosmetics. This particular one was a limited edition and tastes and smells like Cola, but the Bubble Gum lip scrub is a favorite of mine as well. $9.95
The great thing about LUSH is that they don't test on animals and they really strive to use natural products and self-preserving products. 
To use this I will lick my lips so that the scrub sticks to them, then I apply a pea size amount of scrub with a clean finger to my lips. Scrub and then lick or wash off, this is safe to eat! 
Lastly I apply a lip balm. I just bought this Ultra Repair Lip Therapy balm by First Aid Beauty a while ago and I love it! $12.00 
I use this morning and night to soften chapped lips. It works really well in conjunction with the lip scrub! 
So there ya have it! That is my nightly skincare routine. I always, always take off my makeup before bed. I try to take really good care of my skin so it doesn't break out and stays as smooth and healthy as possible! 
I hope you enjoyed and learned something today! Have an awesome week! 
Follow Pretty and Put Together on Instagram, Twitter, Pinterest, and like on Facebook! To follow my personal page click my name below ;) Thanks so much for reading!
https://instagram.com/chelseeparker77/

Wednesday, April 15, 2015

Jamberry Nails How-To & Review

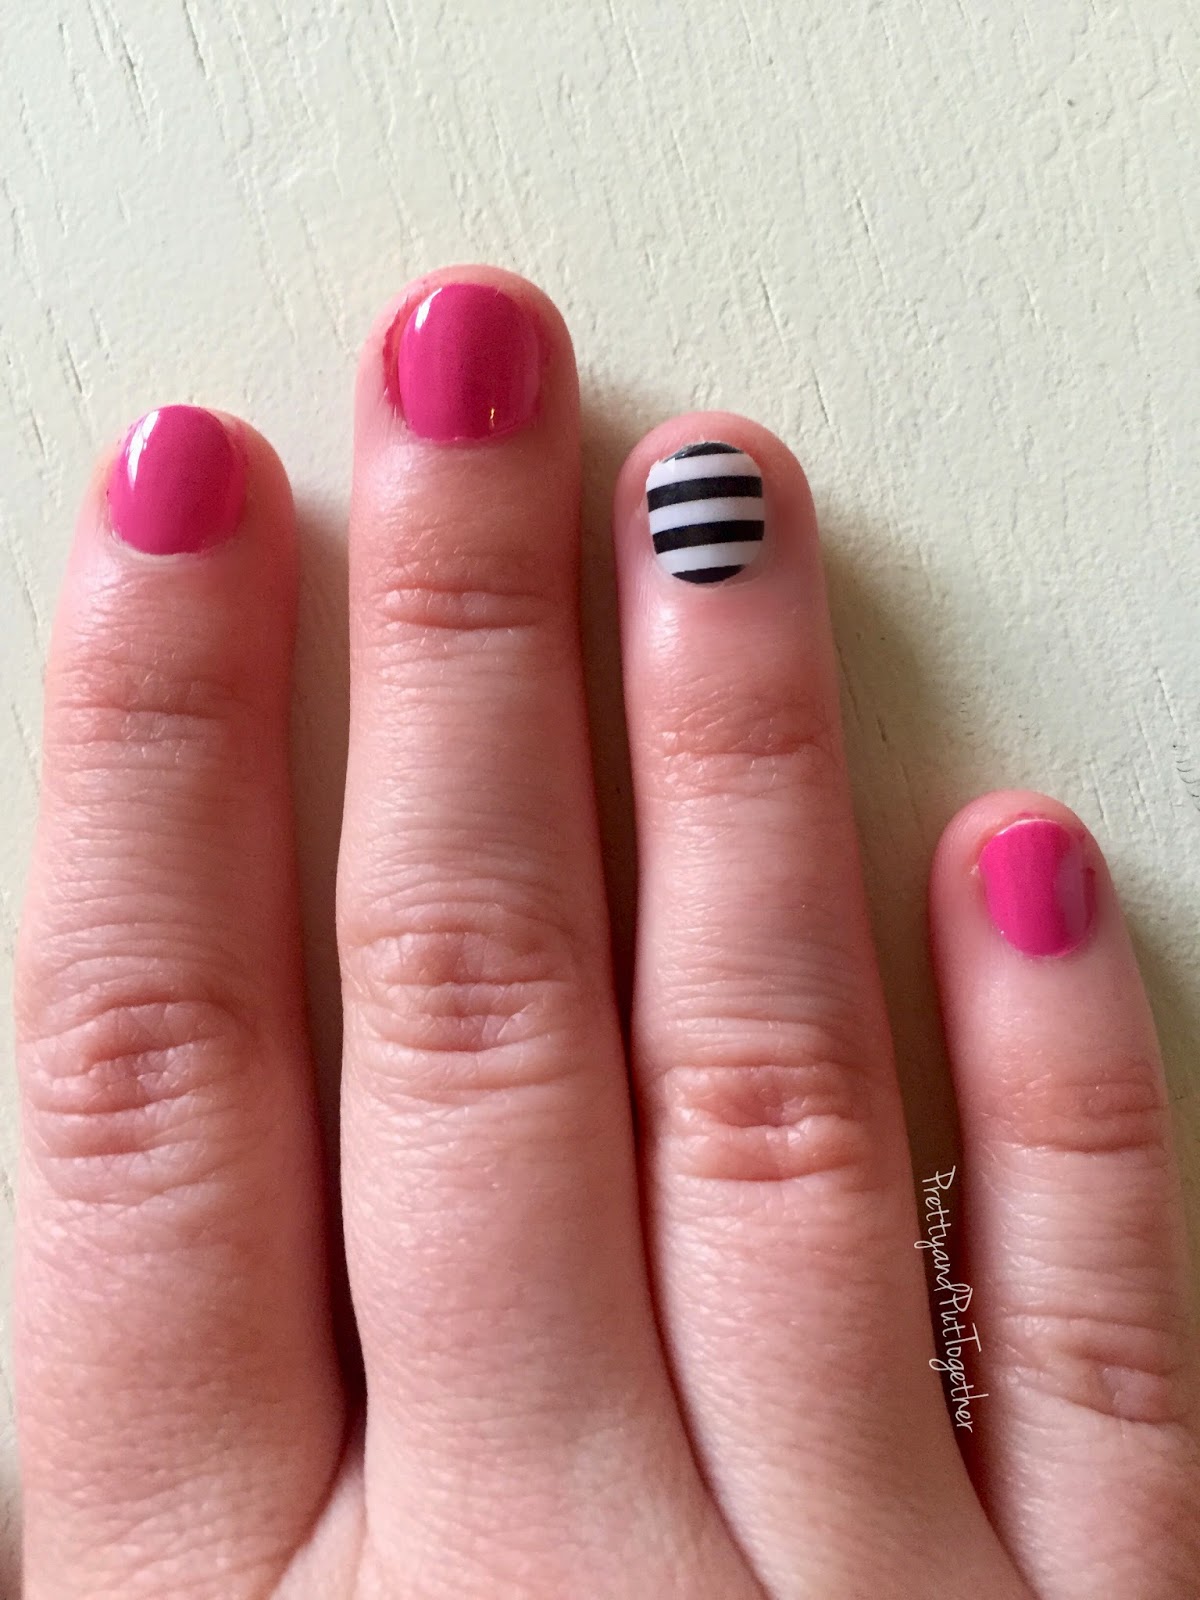
 So I was sent a sample of Jamberry Nail Wraps a while ago & I've honestly been too lazy to try it until now! I just tried them today and they were surprisingly SUPER easy to apply!! I love them! 
I'm very impressed with these! I can't wait to buy more! It's much less work than painting your nails into a fun design and then going through the process of trying not to mess it up all day. Since I just received a sample I only did two nails, but I love how it turned out! 
A set of Jamberry nails is only $15.00, and they have SO many cute designs to choose from! One regular sheet is good for 2-3 applications, depending on the size and length of your nails.
The set I received can be found here
The instructions are as follows (You can also search "Jamberry Application" on YouTube):
1. Clean unpolished nails with alcohol wipe and push back the cuticle. 
2. Match nail (finger or toe) to the nail wrap that best fits. 
3. Peel off nail wrap (from plastic) and warm with a mini heater or blow-dryer for 3-5 seconds or until soft and flexible. 
4. When warm, press the wrap onto the nail. Apply firm pressure around edges to adhere the wrap to the nail. Use rubber cuticle pusher to seal the wrap around the base of the cuticle. 
5. Trim the top with scissors and file off the remaining wrap using a downward motion to remove excess. 
6. Apply heat and pressure to the wrap again until it is bonded to the nail.
Now you have an adorable nail design with no dry time! 
I have to say the hardest parts for me were getting the wrap on perfectly straight, and filing off the excess perfectly. But I did it! 
Aren't they cute?! 
"There are 2 removal options for Jamberry Nail wraps. For wraps that have been worn for more than 10 days we recommend following the Gentle Removal Process" here.
My Jamberry Consultant's name is Samantha Bergeson. Her website can be found here. If you know a consultant but don't have any information besides a name, you can click "Find a Consultant" on the main page and type in their name to shop their website.
Thanks for reading, I hope you enjoyed & learned something new! And I want to thank you all so much for following this blog and my other social media pages, the Instagram page is almost to 500 followers!! I can't believe it! 
You can follow Pretty and Put Together on Instagram, Twitter, Pinterest, and like on Facebook! To follow my personal page click on my name below :) Thanks! Love you all!
https://instagram.com/chelseeparker77/

Tuesday, April 7, 2015

Highlighters & How I Apply Them

Hope you had a great Easter!
This week is all about highlighters! I'm in love with highlighters lately (cue the heart-eyed emoji).. Highlighters are used to give a nice glow to the face, it's almost a dewy-looking finish without having dewy skin. They're especially beautiful with a summer glow!
Here are all the ones I have tried. Keep reading to find out my favorites, how I apply them, and SWATCHES :)
So how I apply a highlighter is with either a fan brush like this pink one from BH Cosmetics, or a small tapered brush like the Sigma F35. Honestly I like using the F35 better than a fan brush to apply most days because it applies more product. 
I tap the brush into the highlighter (tap off the excess) and then brush on the top of the cheekbones, bridge of the nose, and cupid's bow (and sometimes the chin). Applying in these areas will really complement your face. If you don't want attention drawn to your nose or chin don't highlight those areas. 
Sand from Anastasia Beverly Hills contour kit in light is great for just a very subtle, soft, natural glow to the skin. This highlighter doesn't come off as pigmented as others when you apply it with a brush. If you want more color payoff apply it with your finger :)
I use this on days when I'm not wearing much makeup or underneath these other highlighters. $14
NYX highlighter/illuminator in Ritualistic is a gorgeous silver highlight with a little gold reflect. I wouldn't recommend this for dark skin tones because it could come off too white and look chalky. 
This was the first highlighter I ever tried and I loved it! Plus it's really affordable. If you're just starting with highlighters and don't want to splurge, try the illuminators by NYX! $8.99
When I got this highlighter from theBalm this was all I used for months! Meet Mary-Lou Manizer ;) I just love theBalm products because they all have a great sense of humor & adorable packaging. This one is more expensive but I absolutely love it (comparable to Becca Shimmering Skin Perfector in Moonstone). This one has more of a golden glow to really complement that tanned skin! $24
I want to cry because as you can see, I opened this today and it was shattered (probably from traveling home)! I pressed it back together the best I could :( 
This is the heaven of all highlighters for me right now, Becca Shimmering Skin Perfector in Opal. This is a "golden opal pearl" color, it's absolutely stunning. I am SO, SO, SO in love with this!! I took Jaclyn Hill's recommendation on this and I don't know if I could live without ;) Opal is a bit pricey but totally worth it, highlighters last a very long time. 
For paler skin I would recommend the color Moonstone. $38
Now another stunner, Hourglass Ambient Lighting Powder in Luminous Light! This is my most recently purchased highlighter and I have just been alternating between this and Becca Opal. 
This gives a very natural and gorgeous glow. Jaclyn Hill always recommends this for brides because it just looks like you're "glowing from within." I wear this more than Becca Opal because it's just so natural looking. Some days I'll apply this and then later if I go out at night I'll apply Becca Opal. Again, this is on the pricier side and I'm sure there are some comparable products, but If you want to splurge, I highly recommend! $45 
Here are some swatches of all the highlighters I mentioned! The top is with the flash on, and the bottom is in natural lighting.
Thanks so much for reading this post! I hope you loved it and maybe learned something new!! Follow Pretty and Put Together on Instagram, Twitter, Pinterest, and like on Facebook to stay updated on the latest posts :) Click on my name below to follow my personal page! xoxo
https://instagram.com/chelseeparker77/