Showing posts with label Ulta. Show all posts

Thursday, July 16, 2015

Tarte Amazonian Clay 12-Hour Full Coverage Foundation Review

 This post is really overdue since I've had this foundation for a little over 3 months! My skin type is combination oily. At times I get really dry spots on my skin, but for the most part my skin is oily. 
This foundation is available at Ulta and Sephora. I bought the shades "Light Beige" and "Medium Beige" for my tan days. The cost is more high end, at $39. 
PROS 
Coverage (some spots may still show through.. but it's preeettyy full coverage)
Consistency 
Amount of Product
Long-wearing 
Packaging (Easy to use/good for travel)
Cruelty-free Brand 
Selection of shades 
Dries matte 
Perfect for oily skin 

CONS 
Can settle in fine lines and large pores (most foundations do this on my anyway)
Can look cakey if too much is applied 
Clings to dry patches (may not be the best for dry skin types)
I truly love this foundation. It applies really well to my skin and stays on all day. For me it lasts even longer than 12-hours. I use a translucent setting powder to set it since I am extra oily. I use the Morphe Brushes M439 to apply with MAC Fix+

Be sure to follow Pretty and Put Together on Instagram, Twitter, Pinterest, and like on Facebook for more beauty posts!
https://instagram.com/chelseeparker77/


Thursday, May 21, 2015

Brow Tutorial: Anastasia Beverly Hills Dipbrow Pomade

Hi peeps! 
I have been pretty resistant to post a brow tutorial because my brows aren't always perfect, or alike! But I have to remind myself.. Your brows and liner are sisters, not twins ;) I'm not a professional makeup artist in any way nor do I think I am. Take my advice as you will! This is just how I like doing my brows!
So here's everything I use to do my brows :) I pluck my brows every morning before I do my makeup and I probably trim my brows every few weeks when I feel the need...
STEP ONE:  
I fill in my eyebrows after I apply foundation and powder, but before I apply mascara and eyeliner (I didn't wait to do that for these pictures).
Pluck and comb your brows :) Some people prefer to do this after they have drawn on their brows. I have finally grown mine to about what they should be so I know where to and where not to pluck them. I use a spoolie to comb my brows :)
This picture from Beauty Tips is an example of what your brow shape should look like!
STEP TWO: 
I use a NYX angle liner brush and Anastasia Beverly Hills Dipbrow Pomade in Dark Brown to trace the bottom line of my brow. I try to make it darker on the outer tail. Some makeup artists will use two different colors of brow product for an ombre effect. 
Use your brush to blend the product upward. 
 I just want to mention that the brow pomade is $18.00 but I have had this since Christmas and it is no where near gone. This pomade will dry out so be careful to close the lid tight. 
If you're just starting and don't want to spend that much on a brow product, I used the e.l.f. brow duo for a long time and loved it! $3.04 at Target.

STEP THREE: 
Next I trace the top of my brow. I always take the arch up a little higher and the tail longer because I like how it looks :) I also leave a bit of the inner part of the brow blank so it doesn't look boxy.  
Also, my left eyebrow is higher than the right, so I create the arch on the right eyebrow a little higher to match.  

STEP FOUR:   
Now fill in the entire brow. Focus on putting most of the product on the tail of the brow. I just try to drag product upward on the inner part. 
STEP FIVE: 
Comb, comb, comb ;) Combing in the pomade will help make your brows look more natural and blended. 


STEP SIX: 
Now take come concealer on the back of your hand. you don't want it to be too much lighter than your foundation color (just ignore the fading tan on the back of my hand haha).
I use the Garnier Skin Renew Anti-Dark Circle Eye Roller. I use this because it's not too light and it's easy to quickly apply to the back of my hand. Then I get some of the product on this flat brush from BH Cosmetics.
 Trace the underneath and top of your brow to get rid of any imperfections. I like my brows to look really sharp and crisp :) This way if you make any mistakes you don't have to worry too much, they are fixable! 

STEP SEVEN: 
This step I do not do every day. You always want to trim and shape your brows after filling them in so you don't go overboard and end up with nineties, three-haired brows. 
Comb your brows again, then trim off any hairs that are straying from the shape of your brow! 
 These trimming scissors came in a kit I was gifted at Christmas a few years ago. You can find some like these in the makeup section of a store or by the nail supplies, they might be labeled as beard trimming scissors (haha) but as long as they are small they can be used for your brows too.
STEP EIGHT: 
The last step is to comb your brows again and apply brow gel. Applying a brow gel (tinted or clear) will help hold every brow hair in place. 
I use the Sonia Kashuk clear brow gel (it's dirty from using it) from Target for $5.99. I have also tried the clear brow gel from the Ulta brand and it worked really well too.

Now I would move onto doing the rest of my eye makeup :) I just did it first for these pictures.
Your brows are DONE! 
I hope you found this tutorial interesting and maybe learned something new :) I'm sure my brow routine will change again in the future but this is how I've been doing them for a long time now!
Follow Pretty and Put Together on Instagram, Twitter, Pinterest, and like on Facebook to stay updated and see looks I create!
Have a great Memorial Day weekend! 
https://instagram.com/chelseeparker77/


Tuesday, March 17, 2015

Hair Care

Happy St. Patrick's Day!

About five years ago I cut my hair off to my jawline (you have to try it once..), immediately I wanted it back. I get asked all the time if I wear extensions & how I got my hair to grow back so fast, but honestly it's taken this long! I get my hair trimmed every 6-8 weeks :) I used to ask for a "germ-sized trim" when I was still trying to grow it out haha!!
Not only has it taken years, but I've done some damage along the way. I've tried to lighten my hair multiple times & damaged it, which probably slowed growth. But here are some things I think have helped my hair grow and stay healthy recently:
First, Brazillian Blowout! I have only had two in my life so far. The first one I got a few years ago, & I just got one again last month. I would highly recommend getting one! For me, they help to straighten my curls a bit, make my hair shiny, soft, healthy, protected, & lock in color. The biggest thing I noticed it that my hair isn't frizzy! 
I got my last Brazilian Blowout at Jagged Edge Salon. The whole process took about two hours (on my ridiculous amount of hair). 
My sister gets her Brazilian Blowouts from Maleri Miller Parker & both do a great job, we had the same results :) 
My hair is so much easier to do now, & when I straighten it the style lasts longer. If you're trying to grow out your hair or repair some damage I would suggest finding a salon near you that does Brazilian Blowouts. They last up to 12 weeks. The picture above was taken right after getting a blowout.
Shampoo & Conditioner:
Because my hair is so long, it gets dry pretty easy at the ends. I only wash my hair twice a week, sometimes three if it gets oily. 
I change shampoo & conditioner all the time, but since my hair has been red I started using Bain de Terre Color-Protecting shampoo & conditioner.
I also use Joico Color Infuse Red products to keep my red color vibrant between appointments. I use the color infuse once a week (*The color of my hair is Joico 5XR).
Since my Baine de Terre products are almost gone I purchased the Redken Color Extend Magnetics shampoo and conditioner at Ulta, I'll let you know if I like it!
Deep Conditioning: 
I've used Coconut Oil for a long time now on my hair. I just melt it in the sink and apply to dry hair. If you can apply heat or leave it over night that's the best. Remember to look for unrefined, organic coconut oil.
I realize that drugstore products are not the best for your hair, but I actually really like the Garnier Fructis Damage Eraser Strength Reconstructing Butter with phyto-keratin complex. 
I just recently bought the Not Your Mother's Intensive Hair Unit Renewal Treatment and I really like it! Plus it smells good. It has carrot root extract to help repair damaged hair. 
I alternate using one of these once a week. 
Smooth & Shine:
In the past I've used the Brazilian Blowout product until I ran out. I've been using the Rusk Shine Enhancing Lusterizer for a while now. It helps with shine, strengthening with proteins, and protective UVB inhibitors. 
I have recently been using Not Your Mother's Smooth Moves Frizz Control Hair Cream (Ulta in-stores). This helps to de-frizz, straighten, and shine hair. I put these on towel-dried hair. 
Oils & Protectant: 
OGX Coconut Milk Anti-Breakage Serum is awesome! It smells so good too. I use this every single day on the ends of my hair to smooth. This helps repair, resurface, and mend split ends with coconut oil and silk proteins. 
Moroccon Oil Treatment is more expensive, so I use this just a few times a week, and always after I wash my hair. This also helps restore hair, smooth, and shine.
To protect my hair from heat I use Kevin Murphy Damage Manager. This protects hair up to 428 degrees Fahrenheit.
Red Hair Maintenance: 
Besides the Joico Color Infuse products, I have been desperate for a root cover recently. I found this Beyond the Zone Colour Mousse in racy red at Sally's Beauty Supply and it seems to work pretty good, but it did not last 2-3 shampoos on my hair. I applied to dry roots, brushed it in, then blow-dried to seal the color in.
Dry Shampoo: 
Because I only wash my hair two times a week, sometimes the roots can get oily while the ends are dry. Rather than having to wash my hair and go through that whole process I use a dry shampoo. There are tons of great dry shampoos out there, and I really like this one by Tresemmé and the Not Your Mother's brand.
Vitamins:
I know this seems random, but what you put in your body has an effect on your hair. Of course you should eat healthy, but I also recommend vitamins. I take like, 50 vitamins every day haha (exaggeration, slightly)! Of the ones I take I think these have an effect on my hair. 
Melaleuca Vitality Multivitamin and Mineral for women. I noticed this has Biotin in it, which can help with brittle nails and hair growth. I take this every day. 
Cod Liver Oil has Vitamin A which can help with new cell growth and health especially for the eyes and skin. But there are many other benefits to this vitamin, read here. It really doesn't say anything about hair, but I have been taking this for about a year now, so maybe it has played a role in the health of my hair. 
Omega-3 Krill Oil has many amazing benefits as well, especially for heart health. I'm also not sure this played a direct role in my hair health, but it's worth a try :) 
Keratin: 
Lastly, I want to mention something I think had a huge effect on my hair. I don't currently have this product because too much keratin can actually damage your hair (said the lady at Ulta). But this is the It's a 10 Miracle Leave-In Plus Keratin!! When I tried to lighten my hair last summer, I had just got my hair to the length I wanted it to be and then lost about two/three inches to damage from the highlights. This seriously was a miracle on my hair, well this & dying it darker. I went through two bottles of this ;) Highly recommend!
Thank you so much for reading!! I hope you enjoyed and maybe learned something! I'm definitely not a hair expert, but I've pretty much had long, curly, thick hair my whole life! It's a love/hate relationship.. :) Follow Pretty & Put Together on Instagram, Twitter, Pinterest, and like us on Facebook to stay updated on the latest posts! 
https://instagram.com/chelseeparker77


Monday, February 9, 2015

Makeup Brush Collection: Eyeshadow/Brow Brushes

Hello beauties :)
Now that I've shown you the tools I use for my face, I'll show you the tools I use to decorate my eyes! This post will be a bit longer because I have a lot more eye brushes, sowy!
First, this brush is an absolute MUST-HAVE! This fluffy, rounded, synthetic brush has saved my eye-makeup. The reason? BLENDING. If you know anything about eye makeup you know how important it is not to have harsh lines (unless you are doing a cut crease or something)! 
This is the Sigma E40 Tapered Blending brush. I would recommend this to anyone and everyone. This brush is my favorite, and if I had to pick only one brush for my eyes, it would be this baby. It is effortless to blend out and diffuse your eye makeup with the E40. 

Always Google discount codes before purchasing! This brush retails for $16.00.

Another brush I use for more precise blending is this one. This brush has much shorter bristles than the E40, and is very affordable!

This is the e.l.f. Studio Contour Brush. You can purchase this brush at WalMart, Target, or online. Although I haven't used it for contouring my face at all, I find it useful to blend out shadows in the crease. This synthetic brush could be used for liquid or powder products on your face or eyes.

This e.l.f. brush retails for a mere $3.00!


This is another great brush for shadows in the crease. This brush comes to a point at the end so it's great for creating a cut crease or just precise placement of shadow into the crease of the eye. Because of the sharp point on this it could also be used to smudge shadows on the lower lash line.

This is the BH Cosmetics Smudge Brush from the 12 Piece Pink Brush Set. This brush is also made with synthetic bristles. 

This brush set retails for just $10.95 on the BH Cosmetics website! That is less than a dollar a brush! Not to mention they are pink :)


I use this dual ended rose-gold brush to pack shadows onto my lid area. The smaller end of the brush could be used to apply a highlight on the brow bone. 

This brush actually came with the Naked 3 Palette from Urban Decay. This exact brush is not available on it's own but a similar brush is available on their website. I usually don't even use the brushes that come in eyeshadow palettes but this one is really nice!

The duo ended brush similar to this one retails for $20.00 on the Urban Decay website.


This brush I use to pack on shadows onto the lid area as well. It is a flat, rounded brush that could also be used for highlighting or putting shadow precisely into the crease with just the tip. 

This is the Small Eyeshadow Brush from the BH Cosmetics 12 Piece Pink Brush Set. I definitely use this brush everyday! It's great because it can get right into the inner corner of the eye. I use this brush when applying pigments because it's the perfect size for placement on the lid.

Again, this brush set retails for $10.95.


This is a larger version of the brush above. I also use this brush to pack eyeshadows onto the lid. It is flat and rounded as well.

This is the Eyeshadow Brush from the BH Cosmetics 12 Piece Pink Brush Set yet again! This brush is good for packing shadow all over the eyelid, but it can be harder to get color onto the inner corner because this brush is larger in size. 
 
This brush is flat, tiny, and comes to a slight point at the end. I actually don't use this brush as much but it's great for applying shadow on the inner corner of the eye or the lower lash line. You could also use it to highlight the brow bone. 

This is the Fine Eyeliner Brush from the BH Cosmetics 12 Piece Pink Brush Set. I have never used this brush for eyeliner because I find that it isn't quite flat enough for precise eyeliner application.


This tiny brush is angled, so it's great for applying shadow precisely to the lower lash line. 

This is the Angled Eyeliner Brush from the BH Cosmetics 12 Piece Pink Brush Set. Again, this brush is too fluffy for me to use it for liner on the lid area, but I use liquid/gel eyeliners. 


This brush is another absolute MUST-HAVE for me! The tapered pencil tip of this brush allows for so many uses. I use this to blend out shadows on the lower lash line, to apply a highlight to my brown bone and inner corner, and to pack on shadows to the outer corner of the eye. 

This is the Sigma E30 Pencil brush! This brush is also really soft :) 

The E30 retails for $14.00 on the Sigma website. Sigma always has coupon codes so again, don't forget to Google them! 


This brush has really short bristles that are slightly rounded. I use this brush to smudge out shadows on the lower lash line. I do have to say, although the bristles are soft, be careful how much pressure you apply because this brush can feel like it stabs you ha! You could also use this to smudge out shadow or liner on the upper lash line.

This is the e.l.f. Smudge Brush. I have used this every day since I got it for my lower lash line! 

This brush is just $1.00!! I found it at WalMart. It is also available at Target but I did not see it on the e.l.f. website, so maybe it is being discontinued :(


This tiny little pointed brush came for free with a Sigma order :) I was really excited to get this brush because I had wanted to start winging out my liner. 

This is the Sigma E05 Eye Liner brush. Normally it doesn't come in this cute pink color or mini-sized unless you get it for free. I actually don't gravitate toward this brush as much because I found another brush I like better for winged liner that you will see. But it's all about personal preference!

The E05 retails for $14.00 on Sigma Beauty's website. Sigma offers a different free product every month with a qualifying purchase. 


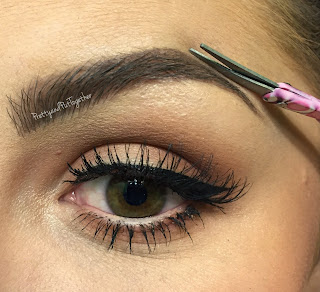
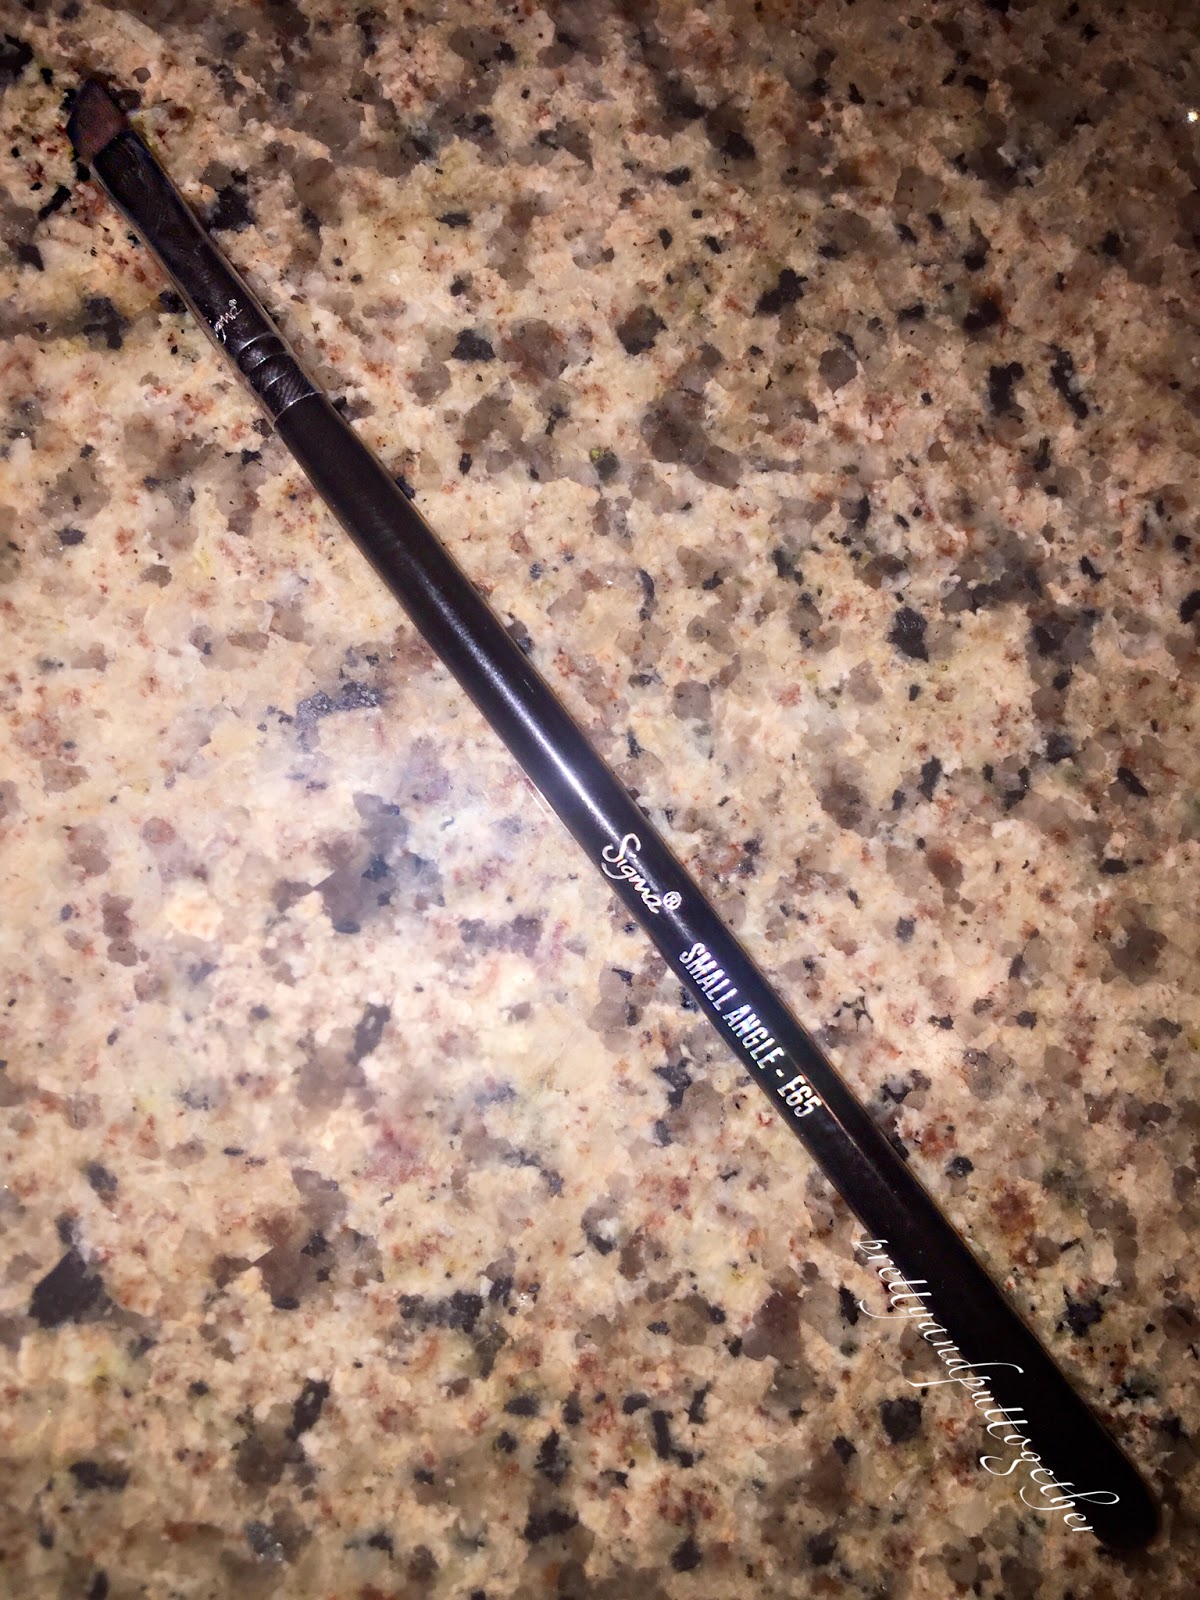
This brush is another one of my absolute favorites! I'm sorry the picture here isn't great, just click on the bold words to see the images on the websites they are sold. I use this brush to do a winged liner or just a simple liner. This brush would also be awesome for shaping your brows! 

This is the Sigma E65 Small Angle brush. It's perfect for winged liner because the shape of this is angled and very thin. But this is also a pretty firm brush so you have a lot of control with the shape of your liner. 

The E65 retails for $14.00 on Sigma Beauty. 


This is just a simple tool I have to comb through my eyelashes if they get too clumpy. If you don't have one of these for your brows you definitely need one for that reason as well :)

These Spoolies/Mascara Wands are available in packages on Amazon or at Sally's beauty supply.

A pack of 12 wands is $3.59 at Sally Beauty Supply.


Now onto the brow brushes! I use this thin, angled brush to shape my brows! I seriously love this brush.

This is the Angle Eyeshadow Brush from Ulta. I actually really like the short handle on this brush because I feel I have a lot of control of it when shaping my brows. I use a brow gel to shape my brows, but this brush would work great with powders as well. Obviously you could use this brush for liner if you didn't want to use it for brows :) 

The Angle Eyeshadow Brush is available online or in stores for $5.99 at Ulta Beauty.


Here is another spoolie brush, but this one I angled and use it for my brows! Using a spoolie on your brows before applying brow products helps in deciding where to place product. Using a spoolie after applying product will help blend out your brows and make them look more natural.


Lastly, this skinny flat brush! You're probably wondering why this brush is in the brow section of my brushes... I use this brush to carve out my brows and correct any mistakes I made. I put a little concealer on the back of my hand and then use this brush to further shape around my brows. 

This is the Flat Eyeliner Brush from the BH Cosmetics 12 Piece Brush Set. I used this brush before on my lower lash line, but I found I like it a lot more to shape my brows! This brush would be really great to apply precise shadow to the lower lash line! 


In case you are wondering, the container I have the brushes in came from Target and it's actually a cotton ball/q-tip holder that comes with lids! You can find really cute containers at The Container Store that could be used for makeup brushes as well. 
WOW thank you for getting through this post with me if you have made it to the end! I hope you enjoyed and learned something new. Thanks for reading!! Be sure to follow us on Instagram. Twitter, Pinterest, and like us on Facebook
http://instagram.com/chelseeparker77