Showing posts with label Anastasia Beverly Hills. Show all posts

Saturday, November 21, 2015

Z Palette Eyeshadows: Makeup Geek, Anastasia Beverly Hills, & MAC

Hi everyone!! ❥ It's been a while...
School has been CRAZY as usual. But it's finally Thanksgiving Break!  


I had a few requests on Instagram to name the eyeshadows that were in this palette. So here is my more neutral Z-Palette, which is finally FULL of eyeshadows! I have had this palette since last Christmas! This palette has a mixture of Makeup Geek, Anastasia Beverly Hills, and MAC single shadows. 


*Makeup Geek (MG) 
*Anastasia Beverly Hills (ABH) 

Top Row: Vanilla Bean (MG), Bling (MG), Peach Smoothie (MG), Creme Brulee (MG), 
Starry Eyed (MG), Birkin (ABH), and Dusty Rose (ABH) 

Second Row: Voltage (MG), Metal (ABH), Pink Champagne (ABH), Grandstand (MG), 
Cocoa Bear (MG), Coppering (MAC), Flame Thrower (MG) 

Third Row: Deep Plum (ABH), Showtime (MG), Bitten (MG), Deep Damson (MAC), 
Rosette (ABH), Mesmerized (MG), Prom Night (MG) 

Bottom Row: Poppy (MG), Mai Tai (MG), Fresh Peach (ABH), Truffle Glitter (ABH), Havoc (MG), Corrupt (MG) 


Now, here is my more colorful Z-Palette :) I haven't quite filled this one up.. yet!


Top Row: Caitlin Rose (MG), Iridescent Purple (ABH), Opaline (ABH), Wisteria (MG), 
Electro (ABH), Day Dreamer (MG), Blacklight (MG) 

Second Row: Mermaid (ABH), Houdini (MG), Dragonfly (ABH), Secret Garden (MG), 
Shark Bait (MG), Pegasus (MG), and Mermaid (MG) 

Bottom Row: Jester (MG), Typhoon (MG), Fantasy (MG), High Wire (MG), Whimsical (MG) 

Makeup Geek


So, there you have it. No, this is not a sponsored post. I adore all of these brands :) 

Thanks for bearing with me in these busy, crazy times. There is a lot of negativity in this world, just remember to be thankful not only this season, but all year long. I hope you all have a great Thanksgiving!! ❥❥❥ 

Follow Pretty and Put Together on Instagram, Twitter, Pinterest, and like on Facebook ❥ 
Leave any requests or comments below!
*Makeup Geek link is an affiliate link 

https://www.instagram.com/chelseeparker77/

Thursday, May 21, 2015

Brow Tutorial: Anastasia Beverly Hills Dipbrow Pomade

Hi peeps! 
I have been pretty resistant to post a brow tutorial because my brows aren't always perfect, or alike! But I have to remind myself.. Your brows and liner are sisters, not twins ;) I'm not a professional makeup artist in any way nor do I think I am. Take my advice as you will! This is just how I like doing my brows!
So here's everything I use to do my brows :) I pluck my brows every morning before I do my makeup and I probably trim my brows every few weeks when I feel the need...
STEP ONE:  
I fill in my eyebrows after I apply foundation and powder, but before I apply mascara and eyeliner (I didn't wait to do that for these pictures).
Pluck and comb your brows :) Some people prefer to do this after they have drawn on their brows. I have finally grown mine to about what they should be so I know where to and where not to pluck them. I use a spoolie to comb my brows :)
This picture from Beauty Tips is an example of what your brow shape should look like!
STEP TWO: 
I use a NYX angle liner brush and Anastasia Beverly Hills Dipbrow Pomade in Dark Brown to trace the bottom line of my brow. I try to make it darker on the outer tail. Some makeup artists will use two different colors of brow product for an ombre effect. 
Use your brush to blend the product upward. 
 I just want to mention that the brow pomade is $18.00 but I have had this since Christmas and it is no where near gone. This pomade will dry out so be careful to close the lid tight. 
If you're just starting and don't want to spend that much on a brow product, I used the e.l.f. brow duo for a long time and loved it! $3.04 at Target.

STEP THREE: 
Next I trace the top of my brow. I always take the arch up a little higher and the tail longer because I like how it looks :) I also leave a bit of the inner part of the brow blank so it doesn't look boxy.  
Also, my left eyebrow is higher than the right, so I create the arch on the right eyebrow a little higher to match.  

STEP FOUR:   
Now fill in the entire brow. Focus on putting most of the product on the tail of the brow. I just try to drag product upward on the inner part. 
STEP FIVE: 
Comb, comb, comb ;) Combing in the pomade will help make your brows look more natural and blended. 


STEP SIX: 
Now take come concealer on the back of your hand. you don't want it to be too much lighter than your foundation color (just ignore the fading tan on the back of my hand haha).
I use the Garnier Skin Renew Anti-Dark Circle Eye Roller. I use this because it's not too light and it's easy to quickly apply to the back of my hand. Then I get some of the product on this flat brush from BH Cosmetics.
 Trace the underneath and top of your brow to get rid of any imperfections. I like my brows to look really sharp and crisp :) This way if you make any mistakes you don't have to worry too much, they are fixable! 

STEP SEVEN: 
This step I do not do every day. You always want to trim and shape your brows after filling them in so you don't go overboard and end up with nineties, three-haired brows. 
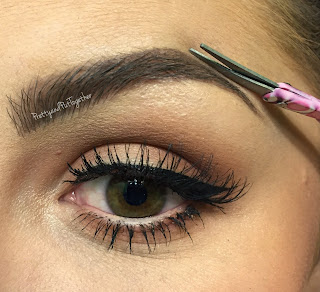
Comb your brows again, then trim off any hairs that are straying from the shape of your brow! 
 These trimming scissors came in a kit I was gifted at Christmas a few years ago. You can find some like these in the makeup section of a store or by the nail supplies, they might be labeled as beard trimming scissors (haha) but as long as they are small they can be used for your brows too.
STEP EIGHT: 
The last step is to comb your brows again and apply brow gel. Applying a brow gel (tinted or clear) will help hold every brow hair in place. 
I use the Sonia Kashuk clear brow gel (it's dirty from using it) from Target for $5.99. I have also tried the clear brow gel from the Ulta brand and it worked really well too.

Now I would move onto doing the rest of my eye makeup :) I just did it first for these pictures.
Your brows are DONE! 
I hope you found this tutorial interesting and maybe learned something new :) I'm sure my brow routine will change again in the future but this is how I've been doing them for a long time now!
Follow Pretty and Put Together on Instagram, Twitter, Pinterest, and like on Facebook to stay updated and see looks I create!
Have a great Memorial Day weekend! 
https://instagram.com/chelseeparker77/


Tuesday, April 7, 2015

Highlighters & How I Apply Them

Hope you had a great Easter!
This week is all about highlighters! I'm in love with highlighters lately (cue the heart-eyed emoji).. Highlighters are used to give a nice glow to the face, it's almost a dewy-looking finish without having dewy skin. They're especially beautiful with a summer glow!
Here are all the ones I have tried. Keep reading to find out my favorites, how I apply them, and SWATCHES :)
So how I apply a highlighter is with either a fan brush like this pink one from BH Cosmetics, or a small tapered brush like the Sigma F35. Honestly I like using the F35 better than a fan brush to apply most days because it applies more product. 
I tap the brush into the highlighter (tap off the excess) and then brush on the top of the cheekbones, bridge of the nose, and cupid's bow (and sometimes the chin). Applying in these areas will really complement your face. If you don't want attention drawn to your nose or chin don't highlight those areas. 
Sand from Anastasia Beverly Hills contour kit in light is great for just a very subtle, soft, natural glow to the skin. This highlighter doesn't come off as pigmented as others when you apply it with a brush. If you want more color payoff apply it with your finger :)
I use this on days when I'm not wearing much makeup or underneath these other highlighters. $14
NYX highlighter/illuminator in Ritualistic is a gorgeous silver highlight with a little gold reflect. I wouldn't recommend this for dark skin tones because it could come off too white and look chalky. 
This was the first highlighter I ever tried and I loved it! Plus it's really affordable. If you're just starting with highlighters and don't want to splurge, try the illuminators by NYX! $8.99
When I got this highlighter from theBalm this was all I used for months! Meet Mary-Lou Manizer ;) I just love theBalm products because they all have a great sense of humor & adorable packaging. This one is more expensive but I absolutely love it (comparable to Becca Shimmering Skin Perfector in Moonstone). This one has more of a golden glow to really complement that tanned skin! $24
I want to cry because as you can see, I opened this today and it was shattered (probably from traveling home)! I pressed it back together the best I could :( 
This is the heaven of all highlighters for me right now, Becca Shimmering Skin Perfector in Opal. This is a "golden opal pearl" color, it's absolutely stunning. I am SO, SO, SO in love with this!! I took Jaclyn Hill's recommendation on this and I don't know if I could live without ;) Opal is a bit pricey but totally worth it, highlighters last a very long time. 
For paler skin I would recommend the color Moonstone. $38
Now another stunner, Hourglass Ambient Lighting Powder in Luminous Light! This is my most recently purchased highlighter and I have just been alternating between this and Becca Opal. 
This gives a very natural and gorgeous glow. Jaclyn Hill always recommends this for brides because it just looks like you're "glowing from within." I wear this more than Becca Opal because it's just so natural looking. Some days I'll apply this and then later if I go out at night I'll apply Becca Opal. Again, this is on the pricier side and I'm sure there are some comparable products, but If you want to splurge, I highly recommend! $45 
Here are some swatches of all the highlighters I mentioned! The top is with the flash on, and the bottom is in natural lighting.
Thanks so much for reading this post! I hope you loved it and maybe learned something new!! Follow Pretty and Put Together on Instagram, Twitter, Pinterest, and like on Facebook to stay updated on the latest posts :) Click on my name below to follow my personal page! xoxo
https://instagram.com/chelseeparker77/

Wednesday, March 11, 2015

Duochrome Purple/Pink Makeup Look

Hello :)
I wore this look on Valentine's Day this year, I loved it so much I thought I'd share! So, if you want to see how I got this look keep reading! 
Eyes: 
First I apply MAC Pro Longwear Concealer in NW20 to prime the eyes. 
As a transition shade in the crease I applied Peach Smoothie by Makeup Geek with a Sigma E40 blending brush. 
Again in the crease I apply Birkin & Dusty Rose from Anastasia Beverly Hills using the E40, focusing the color on the outer corner and blending in. For this look you don't want any harsh lines so blend away!! 
Now take Iridescent Purple (purple with blue iridescence) by Anastasia Beverly Hills and apply it on the outer corner of the lid area using any flat eyeshadow brush. I also layered with Opaline to darken the purple a bit.
On the center of the lid to the inner corner comes my favorite color in this look.. ELECTRO by Anastasia Beverly Hills!! This shadow is amazing! It's a duochrome bright purple with blue iridescence color so it reflects the different colors in different lighting. If you apply this with MAC Fix+ or eye drops the color will become even more intense.
(Indoor lighting, you can see how they reflect different colors)
On the lower lash line use the same ombré effect from Opaline, Iridescent Purple, to Electro into the inner corner. 
To highlight the brow bone and inner corner of the eye I used Bling from Makeup Geek.  


To see the Anastasia Beverly Hills shadows swatches click here

Lashes: 
These lashes are Velour Lashes "Loose Ends" lashes (look up coupon codes!)
Liner: 
Maybelline gel liner in "Blackest Black" on top.
Nyx Cosmetics retractable eye pencil in "Purple" in the waterline.
Brows: 
Anastasia Beverly Hills Dipbrow in "Dark Brown." 
Face: 
Revlon ColorStay 24 hours liquid foundation for normal/dry skin in "Nude" & Revlon ColorStay powder in "Fair." Anastasia Beverly Hills "Banana" powder under the eyes.
Contour: 
Nose contour is Anastasia Beverly Hills Fawn. Cheeks & forehead are Fawn & Java
Blush: 
Makeup Geek "Head Over Heels" and MAC "Margin." 
Highlighter: 
Hourglass Ambient Lighting Powder in "Luminous Light 
on the cheekbones, bridge of the nose, and cupid's bow.
Lips: 
Gerard Cosmetics "Buttercup" lipstick and "Butter Cream" lighted lip gloss (look up coupon codes! I've never paid full price for these!!).
Setting Spray: 
I used Urban Decay "De-Slick" makeup setting spray to set everything since I have oily skin :) 
This stuff is the best!  
Jewelry: 
Earrings are from a Premier Designs jewelry party. 

Thanks for reading! Also, I had someone ask me what my hair color is, and it's Joico 5XR :) 
Be sure to follow Pretty and Put Together on Instagram, Twitter, Pinterest, and like us on Facebook! New blog post every week! xo
https://instagram.com/chelseeparker77


Tuesday, February 17, 2015

Valentine's Day Photoshoot with Whitney Marie Photography

Hi everyone! I hope you all had an amazing Valentine's Day! 
Whitney happened to ask me to do this shoot last week because we thought it would be so fun and the weather has been great. So we grabbed some props & had some fun! Be sure to check out Whitney's photography WEBSITE, on Instagram, Pinterest, and like her page on Facebook :) She does an amazing job & is very talented. We had a great time with this shoot, lots of laughs! 
Keep reading for makeup details & some clothing details as well <3   
This post is going to be long... sowy!


Here I'm wearing a faux fur vest I got from Buckle a while back :) I don't get to wear this much so I thought this was the perfect occasion.

The lipstick I'm wearing is Rimmel London Kate Lipstick in 01 with Gerard Cosmetics Cherry Cordial & Palladio herbal waterproof lip liner in Red Rose.


This is a dress I purchased from a store called Details. I actually bought this to wear to the Katy Perry concert last September!

My eyes are Makeup Geek eyeshadows in Peach Smoothie, Cocoa Bear, Bitten, and Bling (highlight), Anastasia Beverly Hills Eyeshadows in Metal (on the lid area), Deep Plum, Birkin, Dusty Rose, & Fresh Peach. 
Eyeliner is Maybelline gel liner in Blackest Balck & Master Kajal in Onyx Rush on the waterline. 
Brows are Anastasia Beverly Hills Dipbrow in dark brown. 
Eyelashes are "Bianca" from Lena Lashes. They are SO fluffy & beautiful & not too long! 
Contour is Anastasia Beverly Hills contour kit. Blushes are Margin by MAC, & Head Over Heels from Makeup Geek. 
Cheek Highlighter is Becca Shimmering Skin Perfector Pressed in Opal.
Lips are MAC Saint Germain lipstick & Snob lipglass with Nyx lip liner in Sand Pink.
REMEMBER: Always search for coupon codes :)


 The shoes below are Bamboo wedge booties.
"Zooshoo Bamboo DEBRAH-01N Lace Up Wedge Ankle Bootie" I can't find them anywhere, but there are tons of similar shoes!
Jeans are from Bohme Boutique Flying Monkey brand.


These shoes are Jessica Simpson slingback platform pumps :) In these pictures you will see both the red ones & black ones! (Macy's) 


We have reached the end! Thank you, thank you, thank you for checking out Pretty & Put Together & thank you so much WHITNEY for taking these pictures. She is so beautiful inside & out. I have never met a more loving & bubbly person :) Please go check her out!
All photos were taken by Whitney Marie Photography #wmariephotography in Pocatello, ID. She has given me permission to post these on this blog.

Be sure to follow us on Instagram, Twitter, Pinterest, and like us on Facebook!  
http://instagram.com/chelseeparker77