Hi peeps!
I have been pretty resistant to post a brow tutorial because my brows aren't always perfect, or alike! But I have to remind myself.. Your brows and liner are sisters, not twins ;) I'm not a professional makeup artist in any way nor do I think I am. Take my advice as you will! This is just how I like doing my brows!

STEP ONE:
I fill in my eyebrows after I apply foundation and powder, but before I apply mascara and eyeliner (I didn't wait to do that for these pictures).
Pluck and comb your brows :) Some people prefer to do this after they have drawn on their brows. I have finally grown mine to about what they should be so I know where to and where not to pluck them. I use a spoolie to comb my brows :)

This picture from Beauty Tips is an example of what your brow shape should look like!

STEP TWO:
I use a NYX angle liner brush and Anastasia Beverly Hills Dipbrow Pomade in Dark Brown to trace the bottom line of my brow. I try to make it darker on the outer tail. Some makeup artists will use two different colors of brow product for an ombre effect.
Use your brush to blend the product upward.

I just want to mention that the brow pomade is $18.00 but I have had this since Christmas and it is no where near gone. This pomade will dry out so be careful to close the lid tight.
If you're just starting and don't want to spend that much on a brow product, I used the e.l.f. brow duo for a long time and loved it! $3.04 at Target.

STEP THREE:
Next I trace the top of my brow. I always take the arch up a little higher and the tail longer because I like how it looks :) I also leave a bit of the inner part of the brow blank so it doesn't look boxy.

STEP FOUR:
Also, my left eyebrow is higher than the right, so I create the arch on the right eyebrow a little higher to match.

STEP FOUR:
Now fill in the entire brow. Focus on putting most of the product on the tail of the brow. I just try to drag product upward on the inner part.

STEP FIVE:
Comb, comb, comb ;) Combing in the pomade will help make your brows look more natural and blended.


Now take come concealer on the back of your hand. you don't want it to be too much lighter than your foundation color (just ignore the fading tan on the back of my hand haha).
I use the Garnier Skin Renew Anti-Dark Circle Eye Roller. I use this because it's not too light and it's easy to quickly apply to the back of my hand. Then I get some of the product on this flat brush from BH Cosmetics.

Trace the underneath and top of your brow to get rid of any imperfections. I like my brows to look really sharp and crisp :) This way if you make any mistakes you don't have to worry too much, they are fixable!
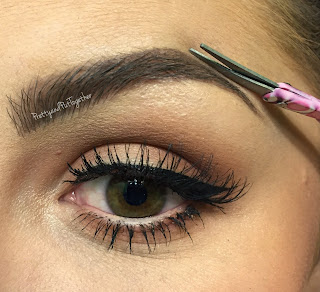
This step I do not do every day. You always want to trim and shape your brows after filling them in so you don't go overboard and end up with nineties, three-haired brows.
Comb your brows again, then trim off any hairs that are straying from the shape of your brow!

These trimming scissors came in a kit I was gifted at Christmas a few years ago. You can find some like these in the makeup section of a store or by the nail supplies, they might be labeled as beard trimming scissors (haha) but as long as they are small they can be used for your brows too.

STEP EIGHT:
The last step is to comb your brows again and apply brow gel. Applying a brow gel (tinted or clear) will help hold every brow hair in place.

I use the Sonia Kashuk clear brow gel (it's dirty from using it) from Target for $5.99. I have also tried the clear brow gel from the Ulta brand and it worked really well too.
Now I would move onto doing the rest of my eye makeup :) I just did it first for these pictures.
Your brows are DONE!

I hope you found this tutorial interesting and maybe learned something new :) I'm sure my brow routine will change again in the future but this is how I've been doing them for a long time now!
Follow Pretty and Put Together on Instagram, Twitter, Pinterest, and like on Facebook to stay updated and see looks I create!
Have a great Memorial Day weekend!
Have a great Memorial Day weekend!

No comments:
Post a Comment